In this brief guide we’ll unveil how to easily share your cloud environment created at Cloudlets Platform with your team.
First of all, you have to register an account and create or import your environment. In such a case you’ll become an environment Owner and will be able to share it with other Users (specifying corresponding access rights for each of them).
Owners have full control over the environment and can permit a User to change its topology and to access it via SSH.
Users can perform a wide range of actions within a shared environment:
- deploy applications,
- change configurations,
- read log files, view statistics, etc.
The only exception is that they cannot clone an environment.
The charges for the environment are applied only to the Owner.
The environment can be shared with:
- registered Cloudlets accounts
- unregistered emails which will be signed up automatically
Environment Sharing with a Registered Account
To share any of your environments with more Cloudlets users and delegate them appropriate permissions, follow these steps:
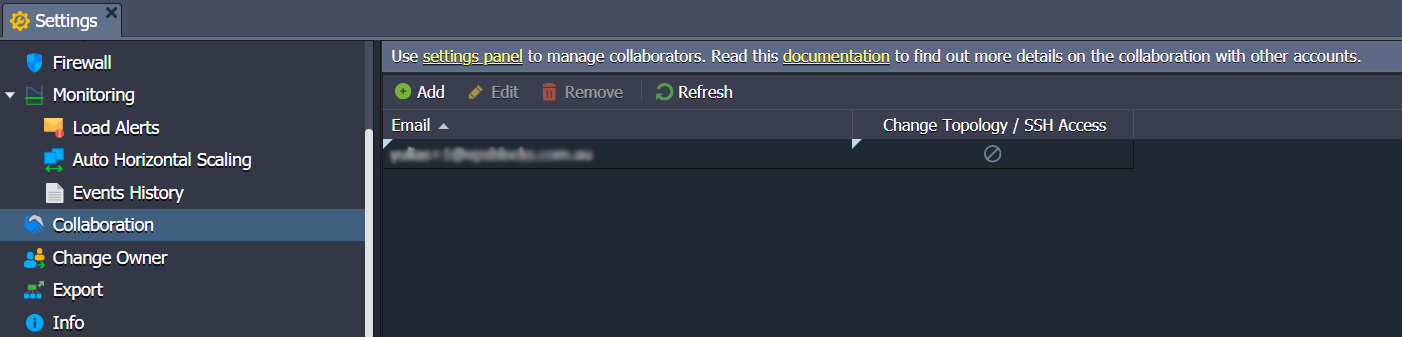
1. Open the environment’s Settings.

2. In the Collaboration section, add email of another user account and tick the Change topology / SSH access option if required.

3. Click Save and after it this user will receive an email notification about environment sharing and can start managing it.
Environment Sharing with an Unregistered Account
To share your environment with a user who is not registered, follow the steps from environment sharing with a registered (1-2) and proceed with a next points:
3. Click the Save button. Firstly, you will see this user in the list with custom triangle signs

which means that the invitation was sent. Then, this user will disappear from the list, as technically the environment is not shared with him yet.
4. A user will get an email notification with an invitation to join your collaboration. When the invitation is confirmed, a user will be automatically registered and will receive an email notification with credentials to the Cloudlets account. You will be informed about this confirmation via email.
Note: at this stage, the user is only registered and added to your collaboration, but no environments are shared yet. You will need to perform sharing steps one more time:
- Navigate to Settings > Collaboration
- Add the same Email of a user
- State the permissions by ticking the Change topology/SSH access option
- Save the settings. A user will receive a notification about the shared environment.
Newly registered users will have trial status by default. As a result, the usual trial limitations set by the hosting provider will be applied, and a user will be deactivated after the trial period, unless the account is converted to a paid one.
Detailed info on your account limitations can be found at the Balance > Quotas & Pricing > Account Limits tab.
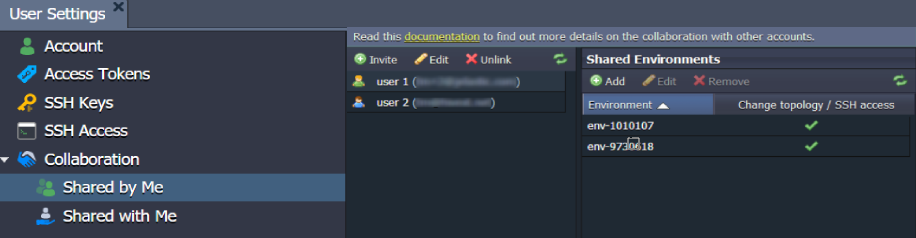
Manage a Shared Environment
To manage the environments shared by/with you, click the Settings button in the top right corner of the dashboard.

Navigate to Collaboration or Shared by/with Me option (depending on your requirements) and manage the desired settings.
If you are the owner of the environment:
In the Shared by Me option, you can remove access to your environment for any user or limit the permissions by unticking the Change topology/SSH access option.
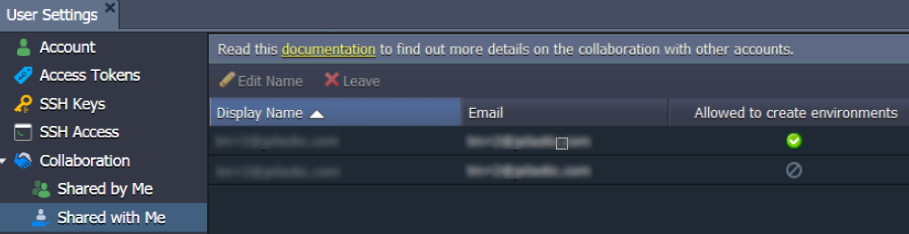
If you are the user of someone’s environment:
In the Shared with Me option, you can decline from using the shared environment.
Register now at Cloudlets and start working together with other members of your team on your cloud environment.