In 2017 Google Chrome has started marking all web-pages that request specifying password or credit card details and aren’t secured with SSL, as non-secure. So that data encryption became a necessity, that made websites admins configure custom SSL certificates, that is not that easy.
Let's Encrypt is a free, automated, and open certificate authority that provides digital certificates in order to enable HTTPS (SSL/TLS) for websites.
Within the Cloudlets Australia platform it is possible to install the out-of-box integrated Let's Encrypt service, that allows getting rid of carrying out regular certificates renewal.
The solution is integrated with popular load balancer and application server stacks, providing a possibility to secure the projects that are run in the cloud.
Let’s Encrypt package can be installed in a click on top of any container with the Custom SSL support enabled, namely the servers from this list:
- Load Balancers - NGINX, Apache LB, HAProxy, Varnish
- Java application servers - Tomcat, TomEE, GlassFish, Payara, Jetty
- PHP application servers - Apache PHP, NGINX PHP
- Ruby application servers - Apache Ruby, NGINX Ruby
In case you’d like to install Let's Encrypt SSL for other stacks, - add a load balancer in front of your app servers and just install the add-on (SSL termination at load balancing level is used by default in clustered topologies).
Mechanism of Action
After the installation, the add-on
- downloads and configures Let's Encrypt client (CMA - certificate management agent),
- requests certificates from Let's Encrypt Certificate Authority (CA),
- applies issued certificates to running software stack according to its SSL integration specifics
- adds a special cron job to initiate certificates update when the expiration date is close.
Let's Encrypt SSL Add-On Installation
Let’s start.
1. Log into Cloudlets dashboard and click Marketplace at the top of a page.

Within the opened frame click Add-ons tab and select the Let's Encrypt Free SSL package.

It is also possible to Import the manifest.jps file from the appropriate Let's Encrypt add-on repository:
https://github.com/jelastic-jps/lets-encrypt/blob/master/manifest.jps
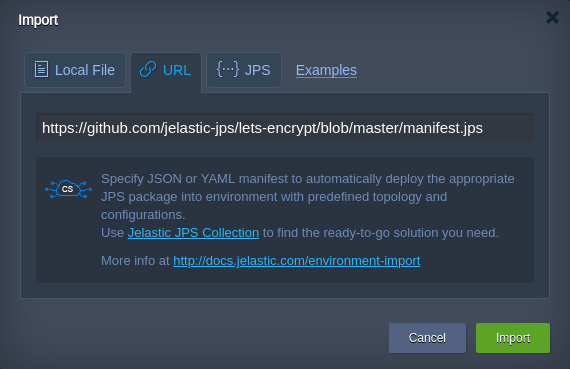
In such a case it’ll be possible to customize it on a fly.
Click Install.
2. After the required data is fetched, you’ll see the Let's Encrypt SSL add-on installation window.

Here, you’ll have to:
- provide External Domain(s) of the target environment. You can leave the field blank to create a dummy SSL certificate, assigned to the environment internal URL. Or insert the linked external domain(s) to get a trusted certificate for each of them (in case of multiple hostnames, just separate them with comma or semicolon);

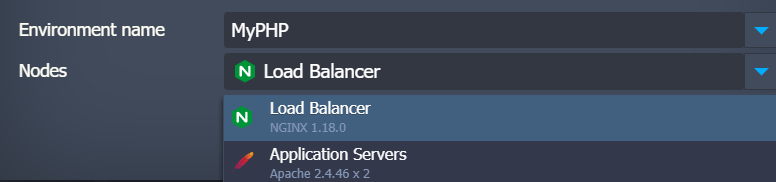
- select the corresponding Environment name within the expandable drop-down list

- select a Nodes layer with your environment entry point (it could be done automatically, but you can customize the nodes selection)
Click Install to initiate installation of the appropriate SSL certificate(s).
Note that the add-on requires Public IP address. So in case, the environment entry point does not have such, it will be automatically attached during installation. Public IP is a paid option - you can find the detailed info right in the dashboard (Click on your balance, and choose Quotas & Pricing)

3. In a couple of minutes your Let’s Encrypt add-on will be ready and running.

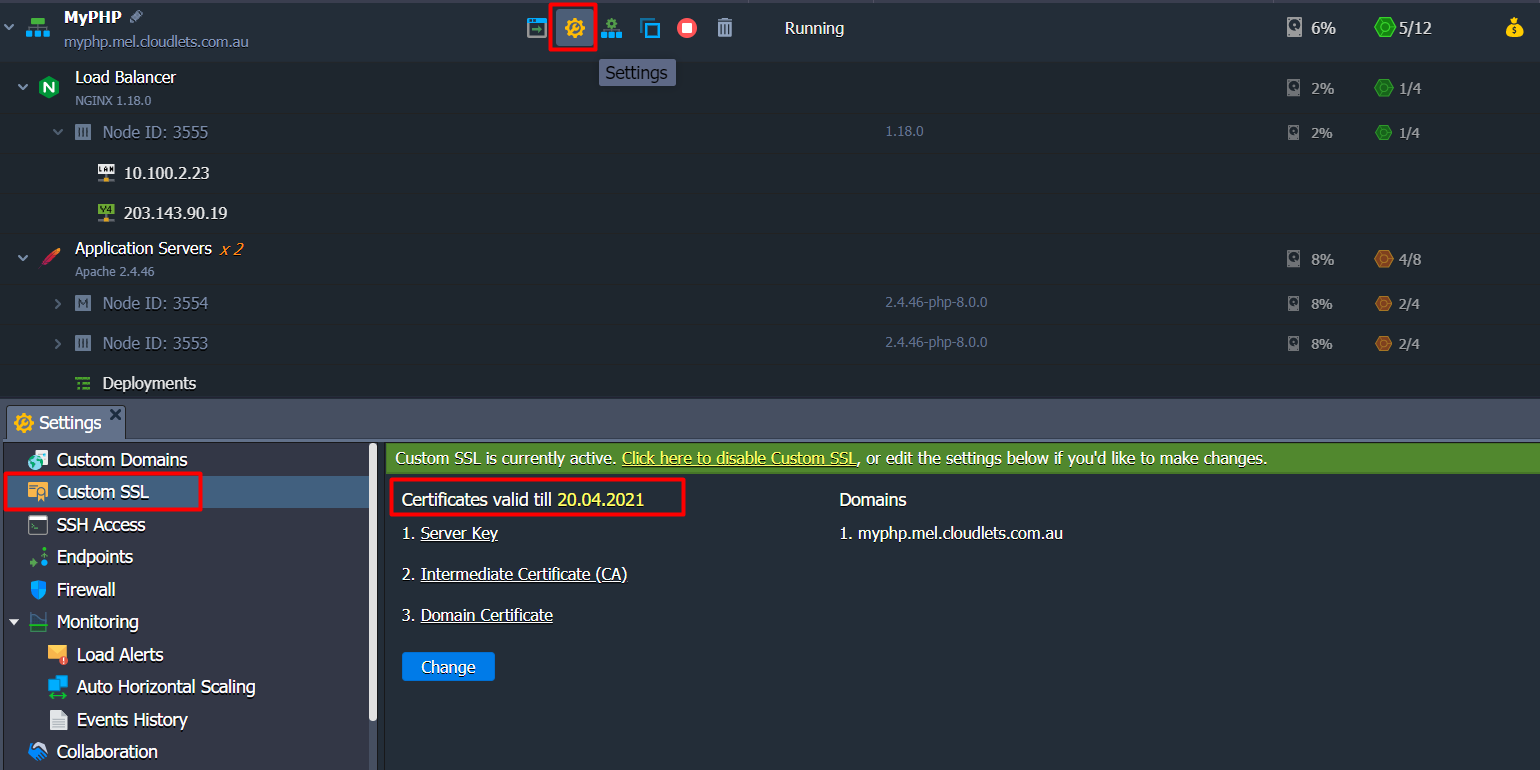
Now you can access the environment Settings > Custom SSL section to check that the HTTPS support is active and check the certificate expiration date.
4. To check whether everything works fine, open your application over HTTPS:

Your environment is accessible and the established connection is secure and browser-trusted.
You can also install Let’s Encrypt add-on via api, for details please check this guide.
Let's Encrypt Certificates Update
Your Let's Encrypt SSL certificate(s) will remain valid for 90 days, and after this you’ll have to renew the encryption.
By default, the required updated SSL certificates are requested and applied automatically 30 days before expiration (you'll get the appropriate email notification). Such a checkup is performed once per day based on the appropriate cron job. If needed, the exact time can be specified through adjusting the corresponding "cronTime": "0 ${fn.random(1,6)} * * *" setting within this package manifest file.
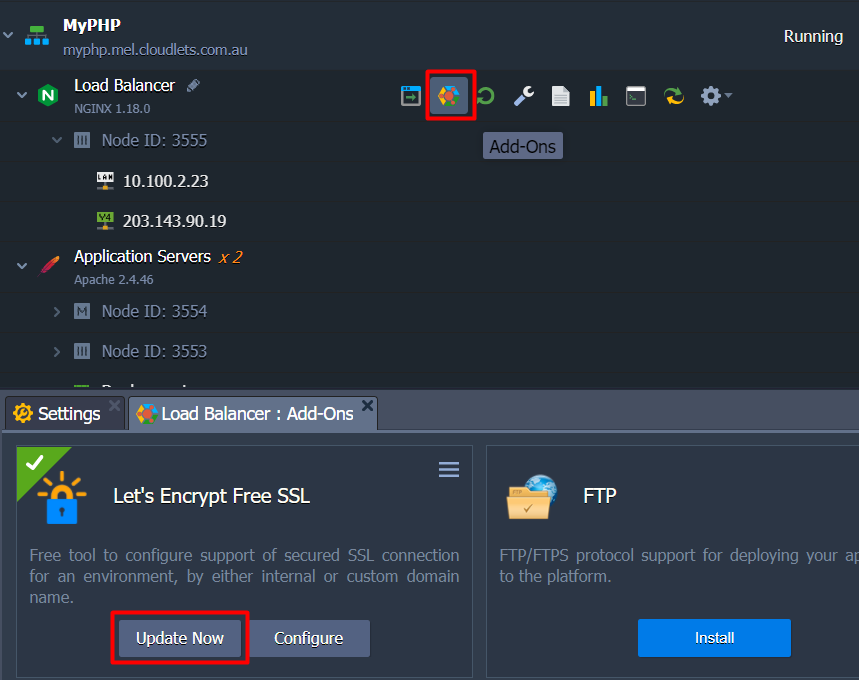
You can also do it manually any time - just click the Add-ons button next to the appropriate environment layer, and then click Update Now.
Your SSL certificates can be updated by add-on re-installation for the same domain name(s) - just note that adding new or specifying different domain name(s) during this procedure will cause the complete replacement of used certificates.
Let's Encrypt Certificates Reconfiguration
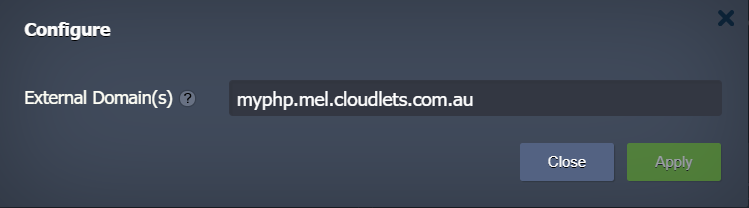
It is also possible to adjust your installed Let’s Encrypt Free SSL add-on - click the Configure button within Let’s Encrypt panel.

Within the opened popup, change the External Domain(s) or remove some of the listed.
Uninstall Let's Encrypt SSL
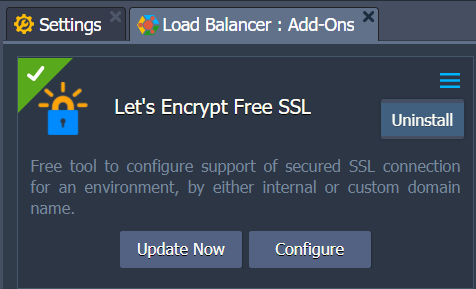
You can also easily remove the Let's Encrypt SSL add-on from your environment. For doing this, go to the Add-ons tab, select Lets’ Encrypt, expand the options list in the top-right corner and select Uninstall:
You can follow the above mentioned steps and install and manage Let's Encrypt add-on for automatic custom SSL configuration of your environment. The add-on will protect your project in no time, for free and without hardly any effort. To try it - register at https://cloudlets.com.au/index.html